Vue.jsとDjangoでサクッとCRUD
つい先日Vue.jsとDjangoで簡単なCRUDを作成する案件があったので手順について紹介します。
以前の投稿とは違い、Django側でレンダリングを行いテンプレート内でVueを使用します。
今回は次の手順を踏んでいきます。
- Djangoインストール
- Djangoプロジェクトとアプリを作る
- Modelの作成とマイグレート
- Django-rest-frameworkのインストール
- シリアライザ、ViewSet、およびルータの作成
- DjangoによるVue.jsの設定
2019/8/6 追記:
以下の投稿で検索フォームを追加しました。
下準備
詳しい説明はもはや不要と思いますので1 ~ 4までを一気に行っていきます。
$python3 -m venv env
$source python/env/path/activate

$pip install django
$django-admin startproject vuejs_crud
$cd vuejs_crud
$python manage.py startapp article
作成したアプリをDjangoに登録します。
settings.py
INSTALLED_APPS = [
    'django.contrib.admin',
    'django.contrib.auth',
    'django.contrib.contenttypes',
    'django.contrib.sessions',
    'django.contrib.messages',
    'django.contrib.staticfiles',
    'article' # 追加
]
続いて今回のModelを作成しましょう。
article/models.py
from django.db import models


class Article(models.Model):
    article_id = models.AutoField(primary_key=True)
    article_heading = models.CharField(max_length=250)
    article_body = models.TextField()
Modelが作成されたのでマイグレートします。
$python manage.py makemigrations                                                                        [~/Documents/GitHub/blog_program/vuejs_crud]
Migrations for 'article':
  article/migrations/0001_initial.py
    - Create model Article

$python manage.py migrate                                                                               [~/Documents/GitHub/blog_program/vuejs_crud]
Operations to perform:
  Apply all migrations: admin, article, auth, contenttypes, sessions
Running migrations:
  Applying contenttypes.0001_initial... OK
  Applying auth.0001_initial... OK
  Applying admin.0001_initial... OK
  ...
Django-rest-frameworkをインストールしsettingsに反映します。
pip install djangorestframeworksettings.py
INSTALLED_APPS = [
    'django.contrib.admin',
    'django.contrib.auth',
    'django.contrib.contenttypes',
    'django.contrib.sessions',
    'django.contrib.messages',
    'django.contrib.staticfiles',
    'article',
    'rest_framework', # 追加
]
これで下準備は完了です。
少し駆け足でしたがCRUDで使用するAPIを作成していきます。
シリアライザ, ViewSet, 及びルータの作成
シリアライザの作成
articleの中にserializers.pyを作成します。
シリアライザはQuerySetやModelインスタンスの複雑なPythonネイティブなデータ型を簡単にJSONやXML形式といったオブジェクトにレンダリングしてくれます。
serializers.py
from rest_framework import serializers
from .models import Article
class ArticleSerializer(serializers.ModelSerializer):
    class Meta:
        model = Article
        fields = '__all__'
より詳細な説明についてはこちらを参照してください。
ViewSetの作成
Django REST frameworkではViewSetと呼ばれる単一のクラスに一連のビューロジックを組み合わせることができます。
ちなみに他のフレームワークでは、 'Resources’や 'Controllers’のような名前で概念的に似た実装がされています。
それではarticleの中にviewsets.pyを作成します。
viewsets.py
from rest_framework import viewsets, filters
from .models import Article
from .serializers import ArticleSerializer


class ArticleViewSet(viewsets.ModelViewSet):
    queryset = Article.objects.all()
    serializer_class = ArticleSerializer
    filter_backends = (filters.SearchFilter,)
    search_fields = ('article_id', 'article_heading', 'article_body')
ViewSetについてのより詳細な説明はこちらを参照してください。
ルーターの作成
今度はdjangoでAPIを作成するためのルーターを作成します。
Railsなどの一部のWebフレームワークはアプリケーションのURLをロジックにどのようにマッピングするかを自動的に決定する機能を提供しています。
ルーターは自動的にそのようなリクエストを自分自身で作成します。
さらに、アプリがすべてのルーターに共通のファイルを作成してAPIを簡単に処理できるようにします。
settings.pyとurls.pyファイルが存在するvuejs_crudフォルダー内にrouters.pyを作成します。
routers.py
from rest_framework import routers
from article.viewsets import ArticleViewSet


router = routers.DefaultRouter()
router.register('article', ArticleViewSet)
ルーターについての詳細な説明はこちらを参照してください。
urls.pyへルーターを登録します。
urls.py
from django.contrib import admin
from django.urls import path, include
from .routers import router


urlpatterns = [
    path(‘admin/’, admin.site.urls),
    path(‘api/’, include(router.urls))
]
今回はベースとなるルーティングとしてapi/を追加しました。
次に以下のAPIを作成していきます。
GET:/api/article/
一覧参照用のAPI
POST:/api/article
新規投稿用のAPI
DELETE:/api/article/{article_id}/
削除用のAPI
GET:/api/article/{article_id}/
詳細表示用のAPI
PUT:/ api / article / {article_id} /
フィールド更新用のAPI
PATCH:/api/article/{article_id}/
投稿の中にパッチを作るAPI
DjangoでVue.jsの設定をする
それではこれらのAPIをテンプレート内に挿入しましょう。
articleフォルダーの中にtemplatesフォルダーを作成し、index.htmlを作成します。
index.html
<!DOCTYPE html>
<html lang=”en”>
  <head>
    <meta charset=”utf-8">
    <title>Vue.js & Django | CRUD</title>
    <meta name=”viewport” content=”width=device-width, initial-scale=1.0">
    <link rel=”stylesheet” href=”https://maxcdn.bootstrapcdn.com/bootstrap/4.0.0/css/bootstrap.min.css" integrity=”sha384-Gn5384xqQ1aoWXA+058RXPxPg6fy4IWvTNh0E263XmFcJlSAwiGgFAW/dAiS6JXm” crossorigin=”anonymous”>
  </head>

  <body>
    <script src=”https://code.jquery.com/jquery-3.2.1.slim.min.js" integrity=”sha384-KJ3o2DKtIkvYIK3UENzmM7KCkRr/rE9/Qpg6aAZGJwFDMVNA/GpGFF93hXpG5KkN” crossorigin=”anonymous”></script>
    <script src=”https://cdnjs.cloudflare.com/ajax/libs/popper.js/1.12.9/umd/popper.min.js" integrity=”sha384-ApNbgh9B+Y1QKtv3Rn7W3mgPxhU9K/ScQsAP7hUibX39j7fakFPskvXusvfa0b4Q” crossorigin=”anonymous”></script>
    <script src=”https://maxcdn.bootstrapcdn.com/bootstrap/4.0.0/js/bootstrap.min.js" integrity=”sha384-JZR6Spejh4U02d8jOt6vLEHfe/JQGiRRSQQxSfFWpi1MquVdAyjUar5+76PVCmYl” crossorigin=”anonymous”></script>

    <script src=”https://cdn.jsdelivr.net/npm/vue@2.5.13/dist/vue.js"></script>
    <script src=”https://cdn.jsdelivr.net/npm/vue-resource@1.3.5"></script>
  </body>
</html>
ブートストラップのCSSとJSのCDNリンクを追加しています。
それからVue.jsのCDNを追加しました。
vue.jsがメインのライブラリでvue-resourceライブラリはREST APIを呼び出すためのものです。
ルーティングもこれに合わせて更新します。
urls.py
from django.contrib import admin
from django.urls import path, include
from .routers import router
from django.views.generic import TemplateView # 追加


urlpatterns = [
    path('admin/', admin.site.urls),
    path('api/', include(router.urls)),
    path('article', TemplateView.as_view(template_name='index.html')), # 追加
]
それではVueのインスタンスを作成しましょう。
index.html
<script src=”https://cdn.jsdelivr.net/npm/vue@2.5.13/dist/vue.js"></script>
<script src=”https://cdn.jsdelivr.net/npm/vue-resource@1.3.5"></script>
<!--ここから追加-->
<script type=”text/javascript”>
  new Vue({
    el: ‘#starting’,
    delimiters: [‘${‘,’}’],
    data: {
    articles: [],
    loading: false,
    currentArticle: {},
    message: null,
    newArticle: { ‘article_heading’: null, ‘article_body’: null },
  },
  mounted: function() {
  },
  methods: {
  }
  });
</script>
el: はdivのIDまたはクラスを指定します。mounted: {} はVueインスタンスのマウント前に実行される関数です。methods: {} はVueインスタンス内で実行されるすべての関数を含みます。
それではまず最初に以下のメソッドを追加します。
- getArticles→全ての投稿を見る
- getArticle→特定の投稿を返す
- addArticle→新しい投稿を追加します
- updateArticle→投稿を更新します
- deleteArticle→投稿を削除します
投稿の一覧表示(getArticles)
mounted: function() {
 this.getArticles();
},
methods: {
 getArticles: function() {
  this.loading = true;
  this.$http.get(‘/api/article/’)
      .then((response) => {
        this.articles = response.data;
        this.loading = false;
      })
      .catch((err) => {
       this.loading = false;
       console.log(err);
      })
 },
 getArticle: function(id) {
  this.loading = true;
  this.$http.get(`/api/article/${id}/`)
      .then((response) => {
        this.currentArticle = response.data;
        this.loading = false;
      })
      .catch((err) => {
        this.loading = false;
        console.log(err);
      })
 },
 addArticle: function() {
  this.loading = true;
  this.$http.post(‘/api/article/’,this.newArticle)
      .then((response) => {
        this.loading = false;
        this.getArticles();
      })
      .catch((err) => {
        this.loading = false;
        console.log(err);
      })
 },
 updateArticle: function() {
  this.loading = true;
  this.$http.put(`/api/article/${this.currentArticle.article_id}/`,     this.currentArticle)
      .then((response) => {
        this.loading = false;
        this.currentArticle = response.data;
        this.getArticles();
      })
      .catch((err) => {
        this.loading = false;
        console.log(err);
      })
 },
 deleteArticle: function(id) {
  this.loading = true;
  this.$http.delete(`/api/article/${id}/` )
      .then((response) => {
        this.loading = false;
        this.getArticles();
      })
      .catch((err) => {
        this.loading = false;
        console.log(err);
      })
}getArticlesメソッドをマウントに設定しページが読み込まれる度に実行することにしました。this.loading = true とありますがこれはAPIがロードされているときのページローディングを表示するのに役立ちます。
その後ろにあるのはAPIを呼び出して応答を処理するためのコードです。
this.$http.request_type(‘api_url’,payload)
    .then((response) => {
      // APIが正常に機能した場合のコード
    })
    .catch((err) => {
      // APIが正常に機能しなかった場合のコード
    })
それではこれらの関数をhtmlに実装していきます。
<div id="starting">
  <div class="container">
    <div class="row">
      <h1>投稿一覧
        <button class="btn btn-success">追加</button>
      </h1>
      <table class="table">
        <thead>
          <tr>
            <th scope="col">🦔</th>
            <th scope="col">ヘッダー</th>
            <th scope="col">アクション</th>
          </tr>
        </thead>
        <tbody>
          <tr v-for="article in articles">
            <th scope="row">${article.article_id}</th>
            <td>${article.article_heading}</td>
            <td>
              <button class="btn btn-info" v-on:click="getArticle(article.article_id)">編集</button>
              <button class="btn btn-danger" v-on:click="deleteArticle(article.article_id)">削除</button>
            </td>
          </tr>
        </tbody>
      </table>
    </div>
  </div>
  <div class="loading" v-if="loading===true">Loading…</div>
</div>これがbodyの基本構造です。<tr v-for="article in articles">
v-forタグを使ってarticleの配列をループさせ表示させます。<th scope="row">${article.article_id}</th>
article.article_id の部分を$ {} で囲んでいますがこれはVueインスタンスに設定されている区切り文字です。
投稿の新規追加(addArticle)
新規追加用にモーダルで画面を表示しましょう。
ボタンを少し差し替えます。
<button type="button"
        class="btn btn-primary"
        data-toggle="modal"
        data-target="#addArticleModal">新規追加</button>
そしてテーブルタグの下にaddArticle Modelを追加します。
<!-- Add Article Modal -->
<div class="modal fade" id="addArticleModal" tabindex="-1" role="dialog" aria-labelledby="exampleModalLongTitle"
  aria-hidden="true">
  <div class="modal-dialog" role="document">
    <div class="modal-content">
      <div class="modal-header">
        <h5 class="modal-title" id="exampleModalLongTitle">
          新規追加
        </h5>
        <button type="button" class="close" data-dismiss="modal" aria-label="Close">
          <span aria-hidden="true">×</span>
        </button>
      </div>
      <form v-on:submit.prevent="addArticle()">
        <div class="modal-body">
          <div class="form-group">
            <label for="article_heading">タイトル</label>
            <input type="text" class="form-control" id="article_heading" placeholder="タイトルを入力してください"
              v-model="newArticle.article_heading" required="required" />
          </div>
          <div class="form-group">
            <label for="article_body">本文</label>
            <textarea class="form-control" id="article_body" placeholder="本文を入力してください" v-model="newArticle.article_body"
              required="required" rows="3"></textarea>
          </div>
        </div>
        <div class="modal-footer">
          <button type="button" class="btn btn-secondary m-progress" data-dismiss="modal">
            閉じる
          </button>
          <button type="submit" class="btn btn-primary">
            保存
          </button>
        </div>
      </form>
    </div>
  </div>
  <div class="loading" v-if="loading===true">Loading…</div>
</div>
<!-- End of add article modal -->
これでフォームを送信するためのv-on:submit.prevent関数が表示されます。
フォームの各入力値は、Vueインスタンス内のデータとマップされたv-model属性によって保持されます。
そしてAPIを実行する部分にv-ifタグがありますが、これによってAPIリクエストがロードされているときに画面上にローダーを表示します。
では早速ここまでの画面表示を確認してみましょう。
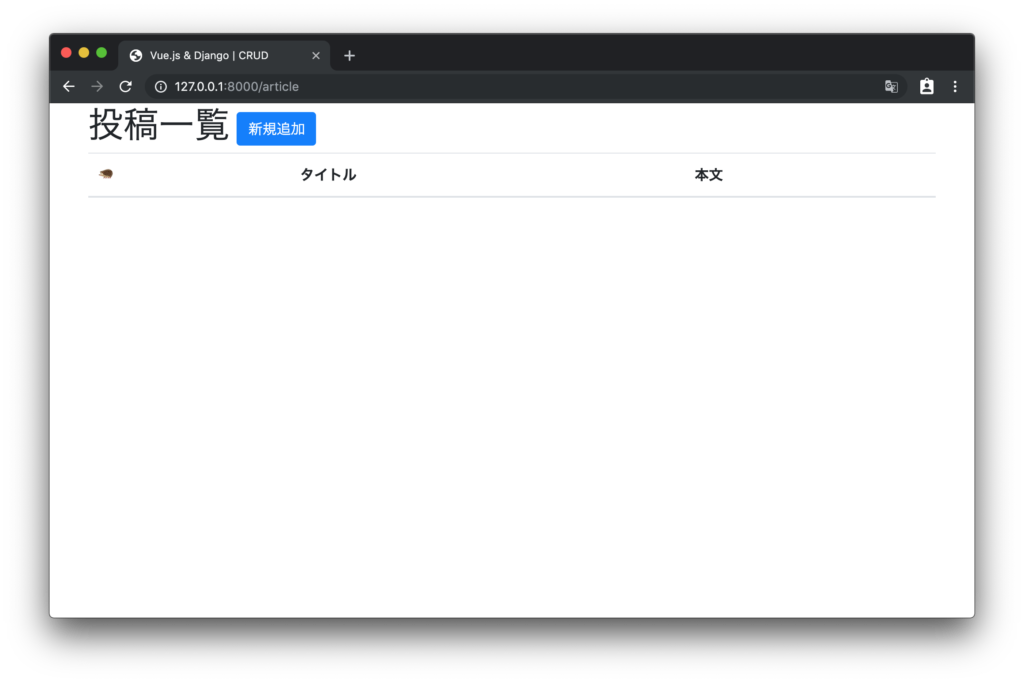
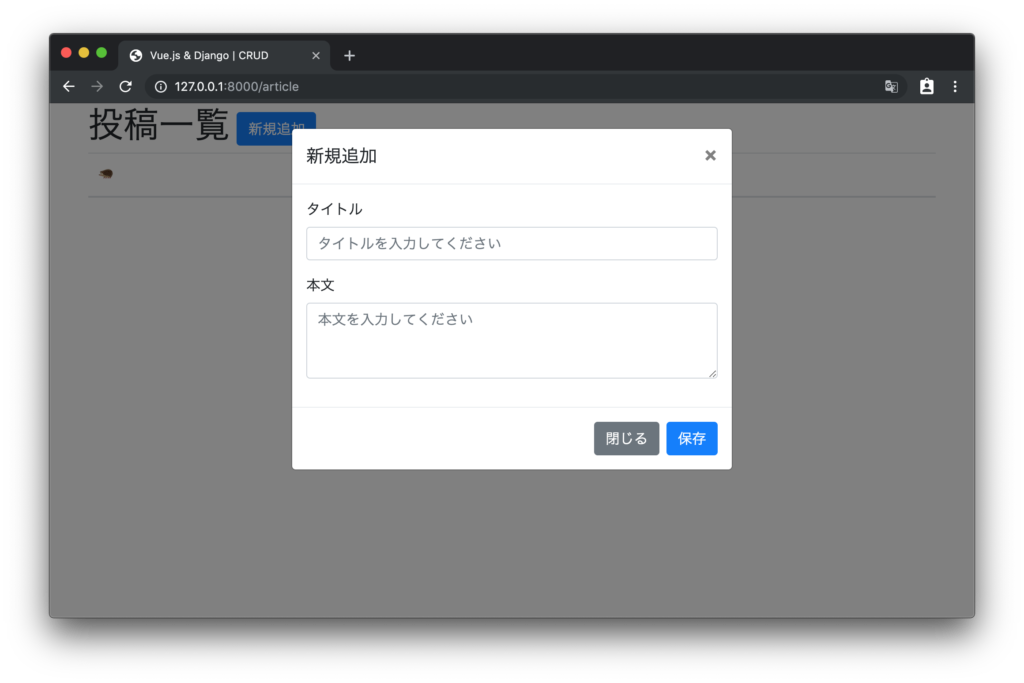
バッチリですね。
いくつかのCSSを充てています、詳細はページ最下部に記載するGitHubへアップロードしたコードを参照してください。
投稿の編集(updateArticle)
続いて編集用のボタンをです。
<button class = "btn btn-info"
        v-on:click = "getArticle(article.article_id)" >編集</button>
この関数はView内の各投稿に対してすでに定義されているため、編集モーダルを表示するようにVue.js関数を少しだけ更新します。
getArticle: function(id) {
          this.loading = true;
          this.$http.get(`/api/article/${id}/`)
              .then((response) => {
                this.currentArticle = response.data;
                $("#editArticleModal").modal('show');
                this.loading = false;
              })
              .catch((err) => {
                this.loading = false;
                console.log(err);
              })
        },
先ほどのはadd modal コードの下にedit modal コードを追加します。
<!-- Edit Article Modal -->
<div class="modal fade" id="editArticleModal" tabindex="-1" role="dialog" aria-labelledby="exampleModalLongTitle"
  aria-hidden="true">
  <div class="modal-dialog" role="document">
    <div class="modal-content">
      <div class="modal-header">
        <h5 class="modal-title" id="exampleModalLongTitle">
          EDIT ARTICLE
        </h5>
        <button type="button" class="close" data-dismiss="modal" aria-label="Close">
          <span aria-hidden="true">×</span>
        </button>
      </div>
      <form v-on:submit.prevent="updateArticle()">
        <div class="modal-body">
          <div class="form-group">
            <label for="article_heading">Article Heading</label>
            <input type="text" class="form-control" id="article_heading" placeholder="Enter Article Heading"
              v-model="currentArticle.article_heading" required="required" />
          </div>
          <div class="form-group">
            <label for="article_body">Article Body</label>
            <textarea class="form-control" id="article_body" placeholder="Enter Article Body"
              v-model="currentArticle.article_body" required="required" rows="3"></textarea>
          </div>
        </div>
        <div class="modal-footer">
          <button type="button" class="btn btn-secondary m-progress" data-dismiss="modal">
            Close
          </button>
          <button type="submit" class="btn btn-primary">
            Save changes
          </button>
        </div>
      </form>
    </div>
  </div>
  <div class="loading" v-if="loading===true">Loading…</div>
</div>
<!-- End of edit article modal -->
この様に変数が変わるだけで殆ど同一の内容で実装できました。
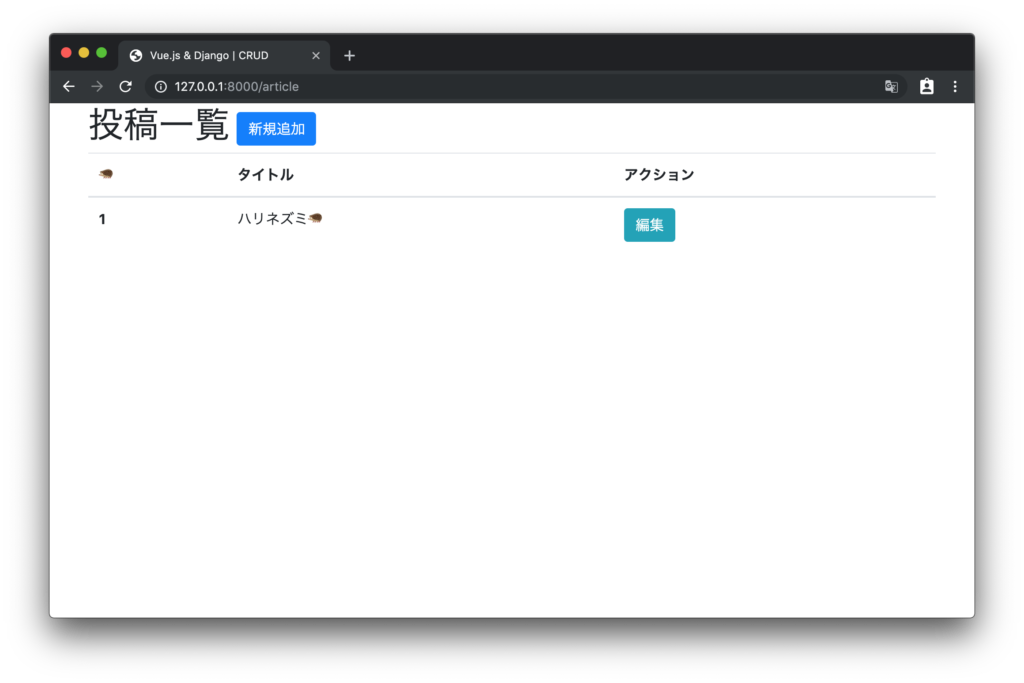
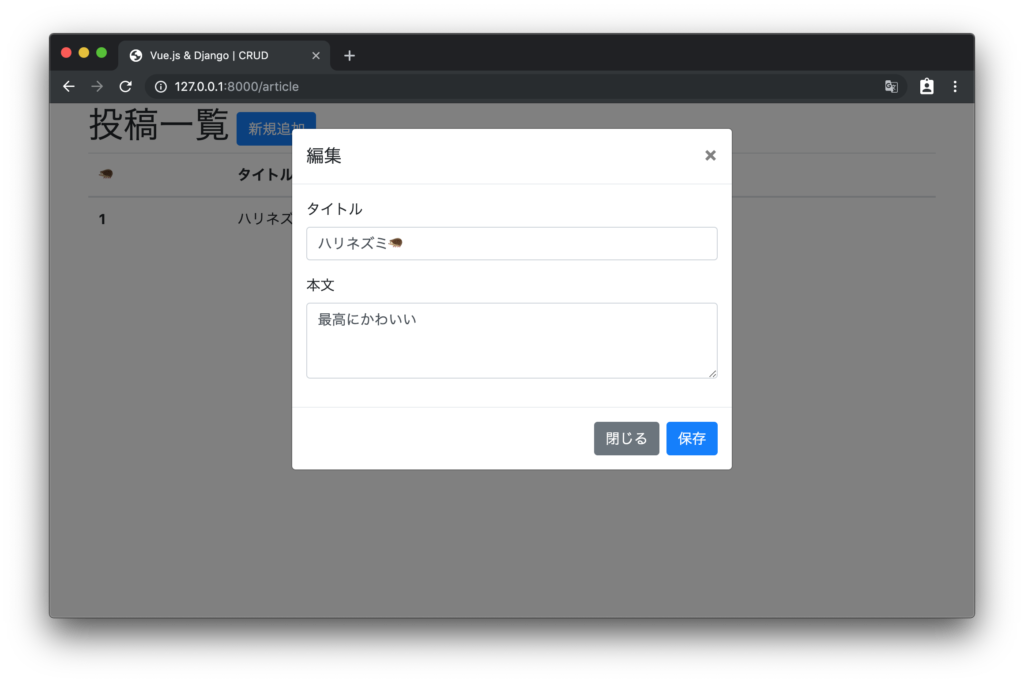
投稿の削除(deleteArticle)
最後に削除用のボタンです。
<button
  class="btn btn-danger"
  v-on:click="deleteArticle(article.article_id)"
>
  削除
</button>ここをよく見てください。v-on:click="deleteArticle(article.article_id)"
v-on:click にdeleteArticleを紐付けています。
つまりボタンを設置しただけで投稿の削除には実装が完了していたのです!
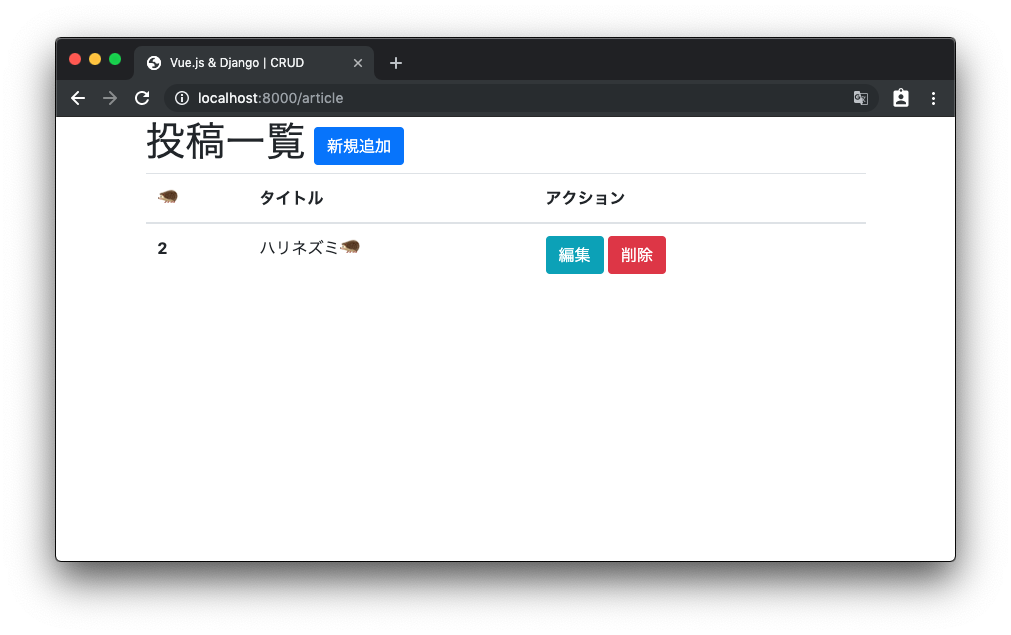
今回は二段階削除やアーカイブをせず直接Deleteしにいくというチャレンジングなことをしていますが、実際に運用する際はアラートメッセージの表示やDjangoAPI側でのアーカイブを実装し今回と同様にv-on:clickに紐付けてやるだけです。
削除ボタンをモーダルの中で表示したい場合も全て同じ手順で実装できます。
まとめ
以前はVue.jsでレンダリングを行いDjango側は完全にAPIのみを提供する形式で実装しましたが、
今回はDjangoテンプレート内でVueを使用する形式をとりました。
Djangoのテンプレート構文とVueのバインディングが完全に被っているため、テンプレート内で何も対策せずにいずれかを使用するとバグを抱えてしまいます。
今度共存させるための方法についても投稿しようと思います。
今回作詞したコードはGGitHubにアップロードしてあります、以下を参照し試してみてください。


